

Chances are, if you’ve been blogging for a while, one of the questions that will inevitably ask yourself is “How can I make my blog load faster?” As a blog publisher or even as a blog reader, you know that a faster loading blog is a better blog. A blog that loads faster is better for your blog readers as they can gain access to the information they’re looking for without having to wait for the page to load. What blog publishers intuitively understand that a faster loading blog is better for visitors. What they sometimes fail to overlook is that he load speed of your blog can affect your search engine ranking because Google places a higher rank (or worth) on blogs that load quickly.
There are two easy things that you can do to increase the load time of your blog: eliminate unused or underused sidebar elements and install a cache plugin.
Eliminate Sidebar Elements
One of the first things I did when I decided to increase the load time of my blog was to look at my blog home page and analyze if there were any elements that were not being used or were mixing up my brand message. A few months back, I installed ad tracker codes on all the links in my sidebar to see if I was actually getting clicks on those links. Turns out, I wasn’t getting many. I’d say probably about 10% of the traffic to my blog was actually clicking on the ads in my sidebar. Plus those ads were essentially driving attention away from my own site, even though they were set to open in a new window. Since I wanted the focus of this site to be on the content I provide and expose visitors to some of my other sites, I opted to move the sidebar ads to another site that actually turned out to be a better fit for the ads themselves.
I also eliminated some graphics that were highlighting programs that I had created that needed to be revised and updated.
By eliminating these two elements, I increased the load time of my blog by 15%. Not bad but could be better.
There are still a few things I’d like to tweak in the sidebars but I’ve got some other tweaks to do first before I make my final changes so I’ll take the 15% for now 🙂
Install W3 Chache
It’s almost impossible to talk about W3 Cache without getting bogged down in the technical details of what this plugin does and how it works. Let’s try to keep things simple. W3 Cache is the fastest and most complete WordPress performance optimization plugin. What that means is that it improves your blog visitor’s experience of your blog by improving your server performance, caching every aspect of your site, and reducing the download time of your theme.
How It Works
Without getting too technical, WordPress uses a scripting language called PHP. Your site’s theme is built through a code framework that builds pages every time someone visits your site. In other words, each web page is built from a central location, then served to your visitors when done. This works fine for low-traffic sites, but when traffic increases the CPU on your web server gets over-worked, and it can’t build the pages fast enough.
When you use the W3 Cache plugin, it pre-builds the pages, stores a copy of the pre-built page, and shows that to the user instead. This way, the pre-built page only has to be rebuilt when the page itself is changed.
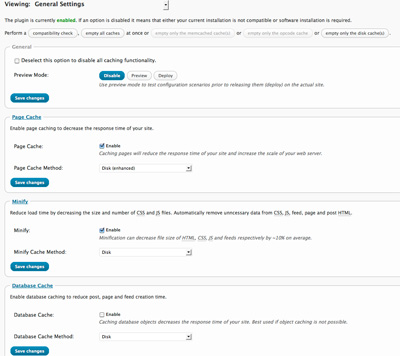
Installation & Configuration
Installation and configuration is a straight forward process. You can download a copy of W3 Cache (it’s free) by visiting: http://wordpress.org/extend/plugins/w3-total-cache/ or install it from your admin dashboard inside WordPress. Configuration is just as easy. Just scroll down the setting page and enable the features you want. Then you test your page load and if everything looks fine, you deploy the installation and you’re good to go.
iChat: WordPress Plugin Questions
If you have any questions about installing a plugin, or want to know more about a particular plugin and how it works, just let me know by posting a comment below.


Leave A Comment